Register to receive free access to all teacher materials.

l Projects
Print
App Inventor with Hummingbird
Learn how to use App Inventor to create an app to control the Hummingbird.
Programming Language
App Inventor
Subjects
Programming Tutorials
Grades
9-12
MIT App Inventor is a development environment in which you can develop apps for Android devices. You develop the app using the App Inventor website while using a companion app to display it on your phone or tablet for debugging. After you have completed your app, you can package it for others to use! This tutorial will describe how you can use App Inventor to create apps to control the Hummingbird. Please note that this tutorial is about creating your own apps for the Hummingbird. If you don’t want to write your own app, BirdBlox is an existing app available for programming the Hummingbird.
This tutorial assumes that you have already set up App Inventor on your computer and your Android device, and that you know the basics of App Inventor. You can get more information about both of those here. You also need a Hummingbird BLE adapter.
Getting Started
- Make sure that your Hummingbird is in bluetooth-ready mode. Instructions are here.
- Download HummingbirdStarter.aia to your computer by right-clicking (or CTRL-clicking) on the file link and saving it.
- Create a new project in App Inventor.
- From the Projects menu, select Import project (.aia) from my computer.
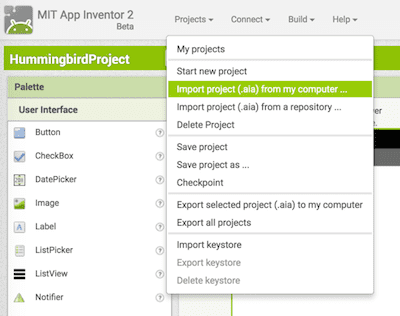
- Select the HummingbirdStarter.aia file and click OK. After the file loads, you will see the app screen shown below.
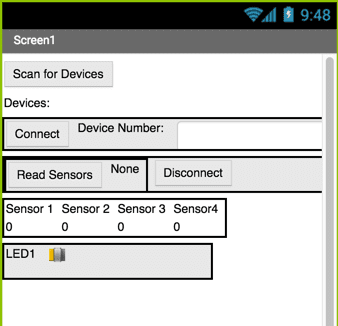
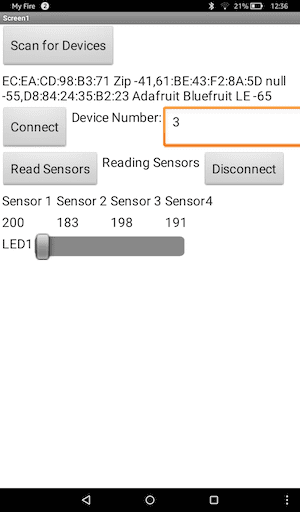
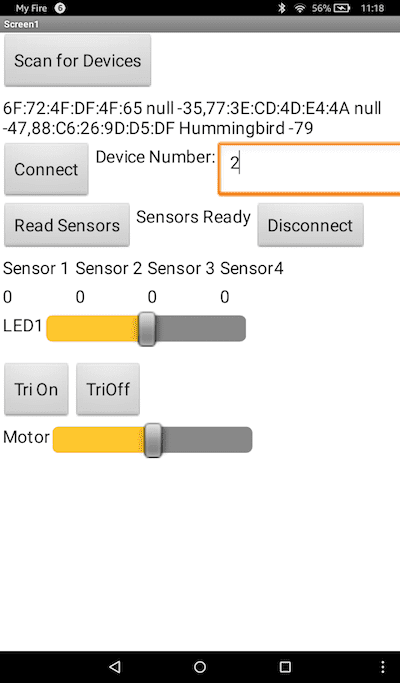
- Use the AI Companion app to link the project to your Android device. You should see the screen below on your Android device.
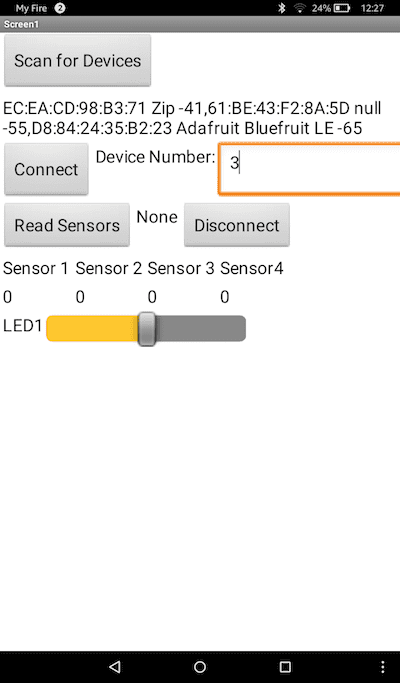
- Press the Scan for Devices button. The display will list all the bluetooth devices in the area; the device names are separated by commas. Your Hummingbird will have the words “Adafruit Bluefruit” in the name. In the example shown below, the Hummingbird is the third bluetooth device in the list. This means that the Hummingbird is device number 3. Put the number of your Hummingbird in the Device Number field.
- Press the Connect button. Make sure that the blue light on the Hummingbird BLE adapter is on. This light tells you whether the you have successfully connected to the Hummingbird with bluetooth. You may need to press the Connect button more than once.
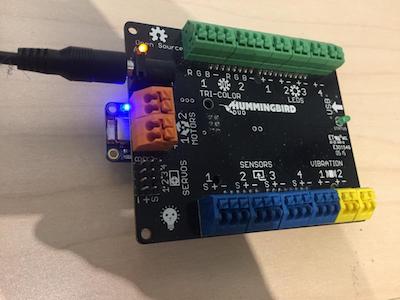
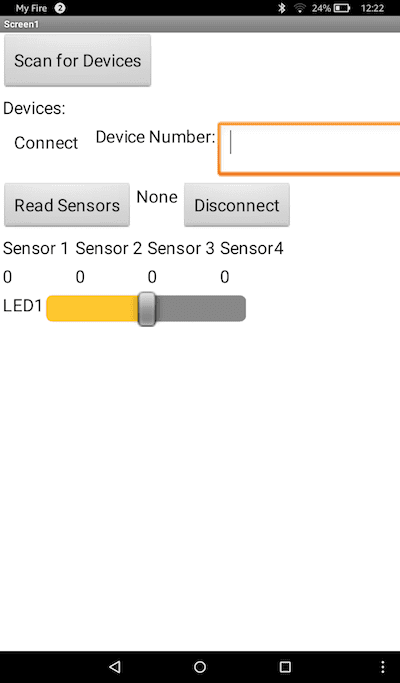
- Attach a single color LED to LED port 1. Move the LED1 slider to make sure that you can change the value of the LED from the app. Please note that using bluetooth does introduce a slight delay between when you move the slider and when the LED responds.
- Attach a sensor to sensor port 1, and then press the Read Sensors button in the app. You should see the values of the sensors begin to change (just ignore sensors 2-4 for now). The value of the sensor will be in the range 0-255. Below, the value of sensor 1 is 200.
Hummingbird Blocks in App Inventor
- Next, switch to the Blocks editor. You will see an event handler for the LED slider, as well as a number of collapsed blocks. The project needs all of the collapsed blocks; do not delete them.
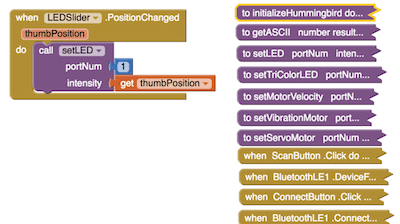
- The blocks that you can use to build an app for the Hummingbird can be found in the Procedures menu. The initializeHummingbird and getASCII blocks are helper functions needed by the project. You will not need to use these. The other five blocks are described below.
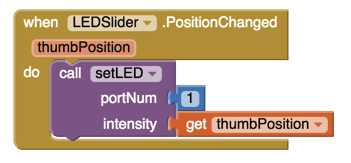
- setLED: This function requires two parameters, the port number of the single color LED (1-4) and the intensity (0-100).
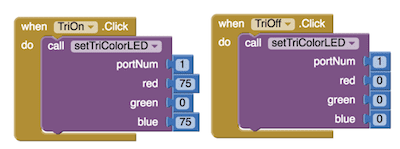
- setTriColorLED: This function requires four parameters, the port number of the tricolor LED (1-2) and the intensity of red, green, and blue (0-100).
- setServoMotor: This function requires two parameters, the port number of the servo (1-4) and the angle (0-180).
- setMotorVelocity: This function requires two parameters, the port number of the gear motor (1-2) and the speed (-100-100). The motor is off for speed 0. The sign of the motor determines the direction of rotation.
- setVibrationMotor: This function requires two parameters, the port number of the vibration motor (1-2) and the speed (0-100).

- You can use these blocks to build an app for the Hummingbird. As a simple example, the starter app has a slider with a minimum value of 0 and a maximum value of 100. This slider is used to control the intensity of the LED in port 1.
- Try out the blocks by creating two blocks named “Tri On” and “Tri Off.” Use these buttons to turn a tri-color LED on and off in your favorite color.
- Next, try out the motor (or the servo). Create a slider with a range -100 to 100 (0 to 180 for the servo). Use the slider to set the value of the motor or servo.
Using the Sensors
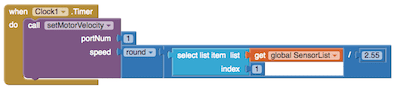
- The blocks described above control the Hummingbird motors and lights, but incorporating the sensors into your program requires a different approach. The sensor values are stored in a list called SensorList. This list has four values, one for each sensor port. Index 1 is the value of sensor port 1, index 2 of sensor port 2, etc. To get a sensor value, use the select list item block from the Lists menu. This block requires two parameters. The first is the list, and the second is the index in that list. To add the value of the list, use the get block from the Variables menu and select “global SensorList” from the drop-down menu.

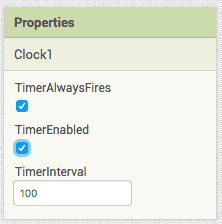
- To control a Hummingbird output with a sensor, you will need to use a Clock component in App Inventor. Add this component to your user interface; it is located under Sensors. Set the properties of this component so that the TimerInterval is 100 milliseconds.
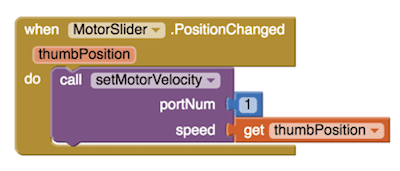
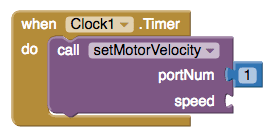
- Remove the slider that you used above to control your motor. Now we will use the rotary knob to control the motor speed. Attach the knob to sensor port 1. In the Blocks editor, use a timer event for the clock; this event will occur every 100 milliseconds. We want to set the speed of the motor each time this event occurs, so place a call to setMotorVelocity inside the event.
- The value of the knob sensor is the first item in SensorList. This value is between 0 and 255. To scale it to a value between 0 and 100 for setMotorVelocity, we divide by 2.55 and then round.
- Now, as you turn the knob, you should be able to change the speed of the motor!
Creating Your Own Apps
To create your own app, start from the HummingbirdStarter.aia file. Save this file under a new name before you begin to modify it. Most of the user interface portions of the starter app are required to use the Hummingbird, but you can delete the LED slider and its label. In the Blocks editor, do not delete any of the collapsed scripts. You need all of these to connect to and use the Hummingbird.
Now you are ready to start creating apps for the Hummingbird! We used sliders to control the lights and motors on the robot shown below, but there are tons of possibilities! Share your creation with us by email to bambi@birdbraintechnologies.com or on Twitter @birdbraintech.